Learn the rules as you follow a game!
Judtho is best played as a four player game (called Judtho Quattro) but the easiest way to learn the rules is with the two player game (called Judtho Duo), which is most similar to chess.
A Judtho set contains pieces of four colours: White, Yellow, Red and Black. The White and Yellow pieces are called the Light pieces and the Red and Black pieces are called the Dark pieces. The two player game uses the White and Red pieces.
Our sample game will be between two imaginary players: Garry with the White pieces and Judit with the Red pieces*.
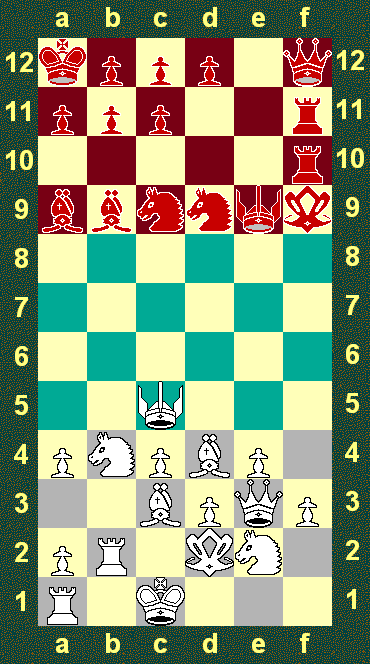
- The game begins with an empty 12 x 6 board...
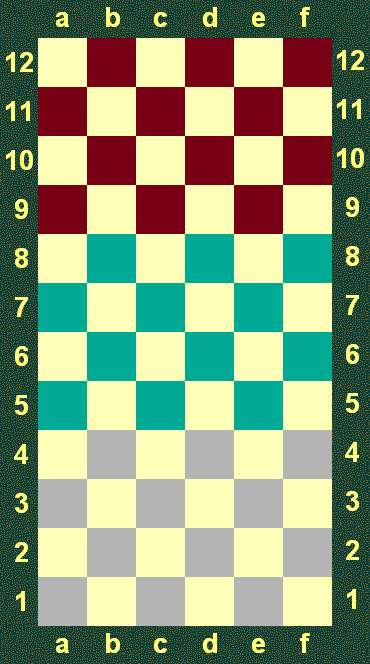
Garry plays first as he has the White pieces. He must place one piece in the area of the board between a1, a4, f4 and f1. Judit will place her pieces in the area between a9, a12, f12 and f9.
- There are eight different types of pieces in Judtho, so we'll learn about each as we go along.
A photograph of the different pieces is shown below. The pieces are, from left to right:
The King, Queen, Prince, Princess, Bishop, Knight, Rook and Pawn.
The King, Queen, Prince, Princess, Bishop, Knight, Rook and Pawn.

Each player starts with 1 King, 1 Queen, 1 Prince, 1 Princess, 2 Bishops, 2 Knights, 2 Rooks and 6 Pawns.
The pieces are denoted by the following symbols (starting numbers, algebraic notation letters and classification (see below) in parentheses):
The pieces are denoted by the following symbols (starting numbers, algebraic notation letters and classification (see below) in parentheses):

King (1; K; unclassified)

Queen (1; Q; Long Range)

Prince (1; C; Short Range)

Princess (1; S; Short Range)

Rook (2; R; Long Range)

Knight (2; N; Short Range)

Bishop (2; B; Long Range)

Pawn (6; (P); unclassified)
Six of the pieces above can be divided into two categories: the Long Range pieces and the Short Range pieces.
The Long Range pieces are the Queen, Bishop and the Rook.
Long Range pieces can move to the edges of the board in one move (unlimited range) if there is no piece in their path.
All Long Range pieces move in straight lines only, do not jump and cannot make multiple captures.
The Long Range move diagrams use the following type of symbols:


This indicates unlimited range, no multiple captures and no jumping.
The Short Range pieces are the Prince, Princess and the Knight.
Short Range pieces can make multiple captures and have limited range.
In addition, the Princess and the Knight can jump (in fact, the Knight only jumps when it moves). Also, the Prince and the Knight have more complex move patterns (i.e. not simple linear movement).
The Prince's move diagrams use the following type of symbols:


This indicates limited range, multiple captures but no jumping.
The Princess' move diagrams use the following type of symbols:
The Princess' move diagrams use the following type of symbols:


The Knight's move diagram uses the following symbol:

This indicates single square jumping and distant, multiple captures.
The King and the Pawn are excluded from the above classification principally because they have different roles in the game. The King must be protected from capture or from being attacked by a Knight as either of these will result in losing the game. The Pawns are more numerous than the other pieces and, as such, usually help defend the King initially.
Let's now follow the game!
Garry and Judit take turns to place one piece at a time. This process of placing pieces is called the Assembly. Their moves will also be written in algebraic notation.
Algebraic notation is the system used to record moves in Judtho with the following conventions:
- A letter denoting which piece is moved is written followed by the destination square.
- Pawn moves (except for captures) are just indicated by the destination square.
- The symbol ... is used for a move by Red, indicating that White's move has preceded it.
- If two pieces of the same type could have made the move, either the rank or file of the piece is given to clarify.
- A capture (with movement) is given the symbol x whereas a Knight's distant capture (without movement) is given the symbol *. Multiple captures are separated with commas.
- The symbol ++ indicates that a win condition has been achieved. In the two player game of Judtho, 4 points are given for a win and so either 4-0 or 0-4 will be written, indicating wins for White or Red respectively.
- The Assembly moves are preceded with the letter A.
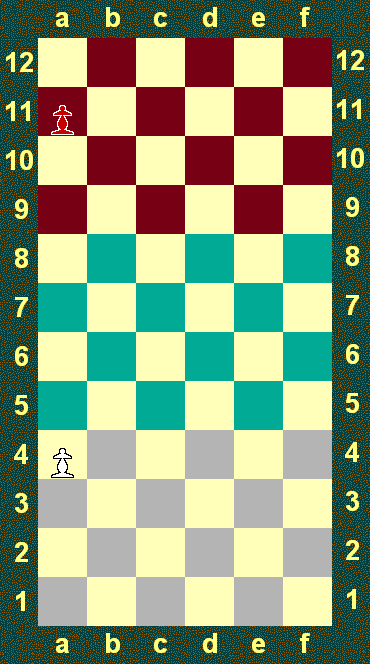
Garry places a Pawn, on a4. This is recorded in algebraic notation as:
A1: a4
A1: a4

Judit responds by placing a pawn on a11.
A1: ... a11
A1: ... a11
Let's rejoin the game after the Assembly is complete. Note that no piece can be moved once placed during the Assembly.
There are three ways to win in Judtho:
1. Capture your opponent's King (this is called Regicide)
2. Attack your opponent's King with a Knight (or Knatch the opponent's King - a contraction of the words "Knight" and "attack". This is a special form of Regicide.)
3. Capture all your opponent's pieces except for the King (termed Annihilation).
Regicide is easier, so Garry and Judit will focus their efforts on the opposing King.
Before making the first move, Garry notices that his Prince on f4 is attacked by Judit's Bishop on a9...
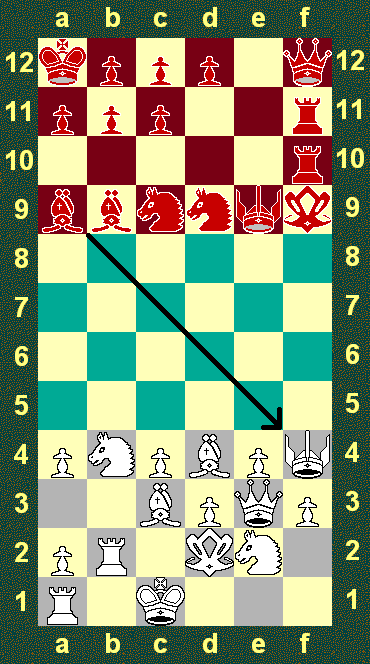
This is because Bishops move along diagonals...
So Garry moves his Prince to the safe square c5.
1: Cc5
1: Cc5
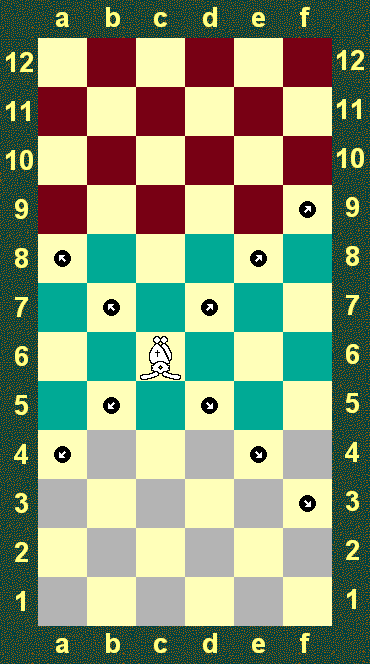
The Prince either moves one, two or three squares along a rank (left or right) or file (up or down)...
...OR the Prince moves one square diagonally only OR one square diagonally AND one or two squares along a rank or file, moving away from the original square:
The Prince's complete move is shown by the following diagram:
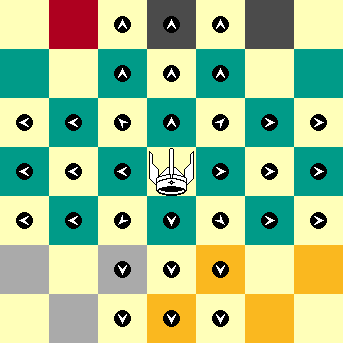
Note how the Prince's move forms a + shape on the board. It is very important to note that the Prince does NOT jump over other pieces. The Prince can make multiple captures (up to 3 pieces in a straight line in accordance with the diagram above). Finally, if the Prince makes a multiple capture, the move must always end with the last piece captured.
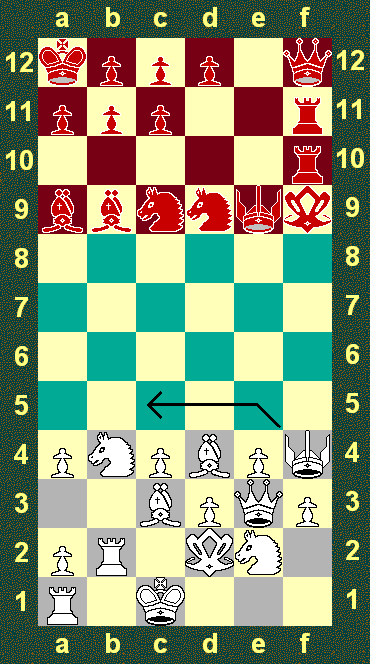
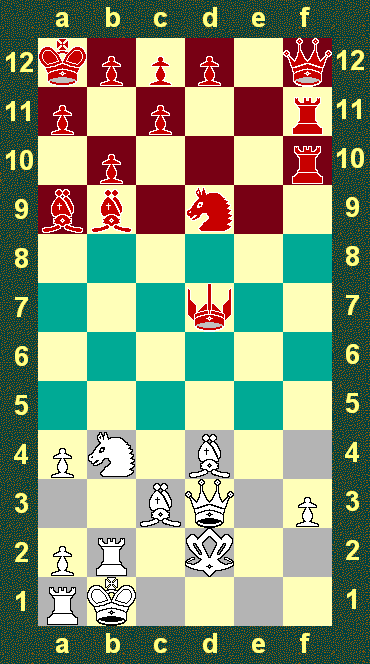
Let's return to the game - we now have the following position:
Let's return to the game - we now have the following position:
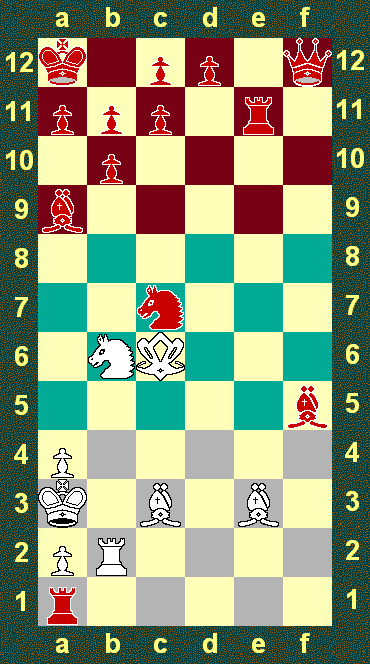
Judit now moves her Knight from c9 to d7:
1: ... Nd7
1: ... Nd7

The Knight jumps in an L-shape:

The Knight has 3 special powers:
- It jumps over pieces so it is never blocked by its own pieces.
- Instead of moving, it can capture any piece that it attacks (distant and, potentially, multiple, distant captures).
- If a Knight attacks (termed "knatches") an opponent's King, the game is immediately won.
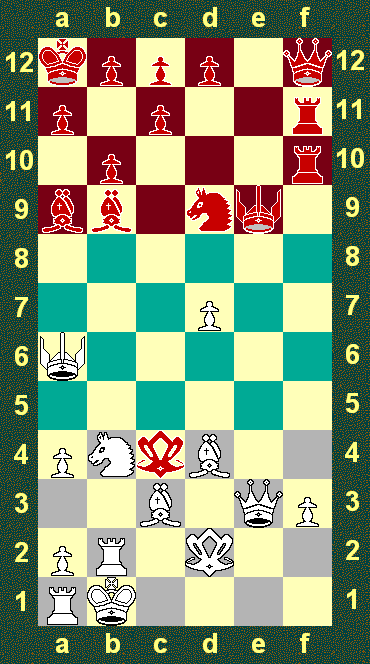
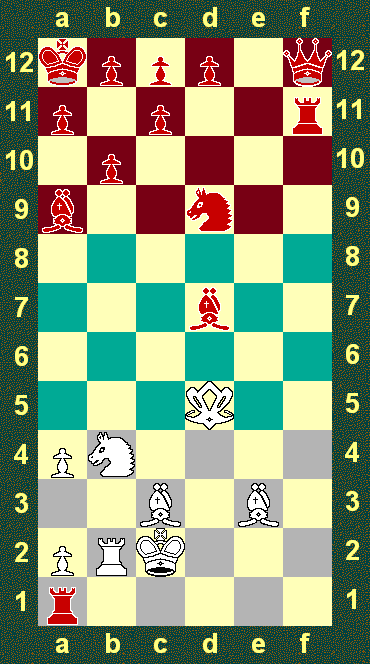
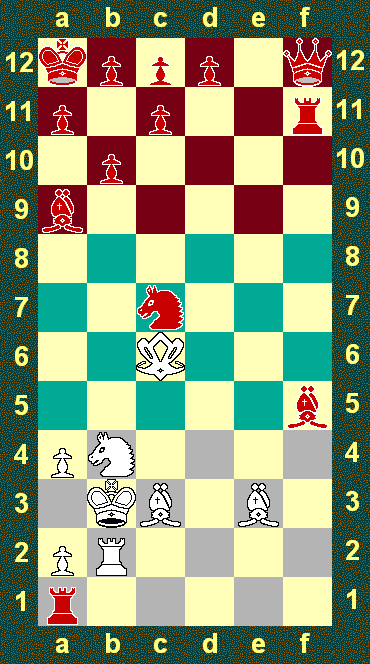
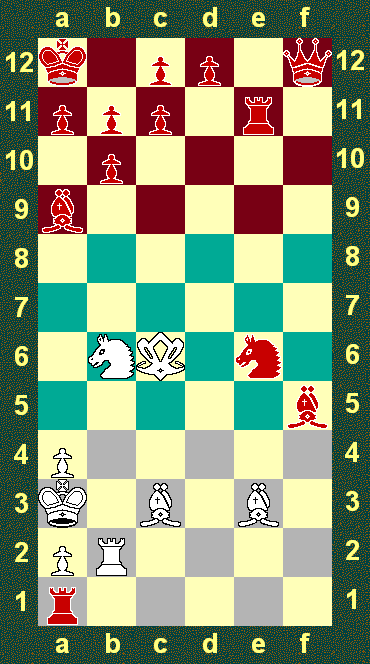
You will have noticed that Judit's Knight was attacking Garry's Prince, so Garry moves his Prince to a6:
2: Ca6
2: Ca6

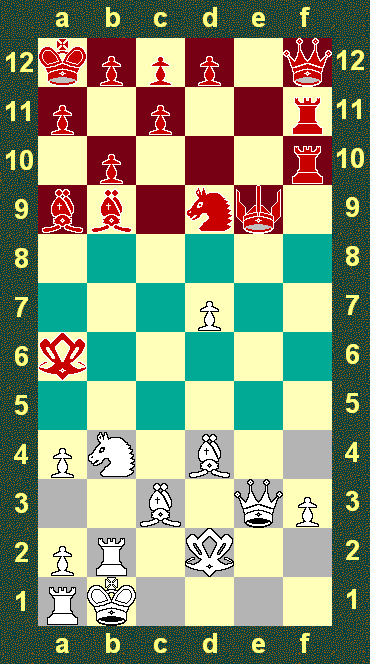
This is a dangerous move because Garry is threatening to capture Judit's Bishop on a9. Judit could not capture back Garry's Prince because no piece is protecting the a9 Bishop. Therefore, Judit's King could be captured on Garry's next move, because it is trapped by its own Pawns.
Garry could also capture Judit's Bishop on b9 but this would not be a good move because it is actually protected by Judit's Princess on f9 - we shall see why when we learn the Princess' move.
Judit protects her Bishop on a9 by moving her Pawn on b11 to b10.
2: ... b10
Garry could also capture Judit's Bishop on b9 but this would not be a good move because it is actually protected by Judit's Princess on f9 - we shall see why when we learn the Princess' move.
Judit protects her Bishop on a9 by moving her Pawn on b11 to b10.
2: ... b10

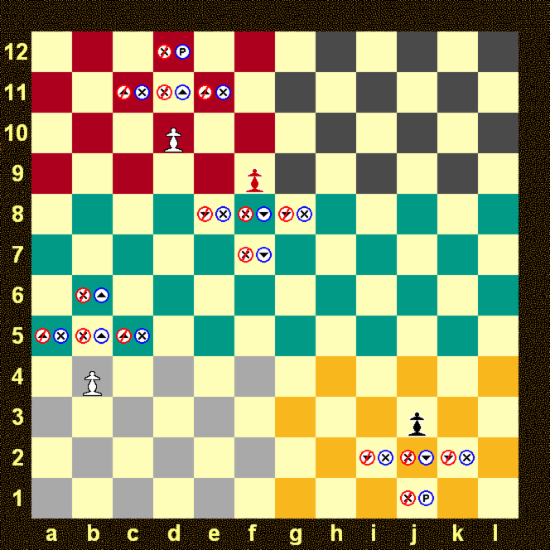
The Pawn moves either one or two squares towards the opponent only. However, it captures only one square diagonally. In this diagram, a capture is denoted by an x whereas movement is denoted by an arrow. A Pawn can also jump over a single other Pawn (either friendly or the Opponent's) provided the destination square is empty. A Pawn cannot jump over any other piece and can only jump over one Pawn.
The Pawn also has a special power of promoting to any piece when it reaches the opponent's first rank (i.e. the one furthest away). The diagram below summarises the Pawn's move in different situations (pawn promotion squares are marked with a P):
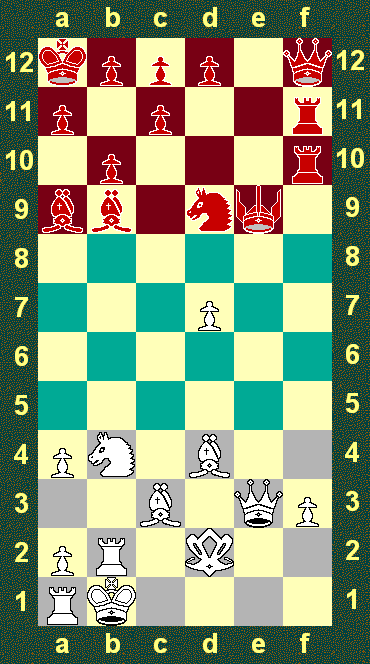
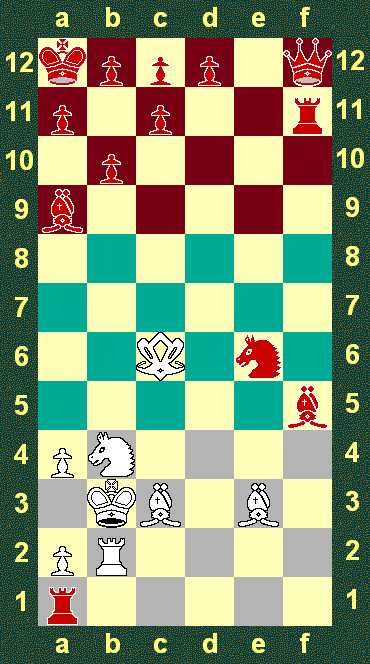
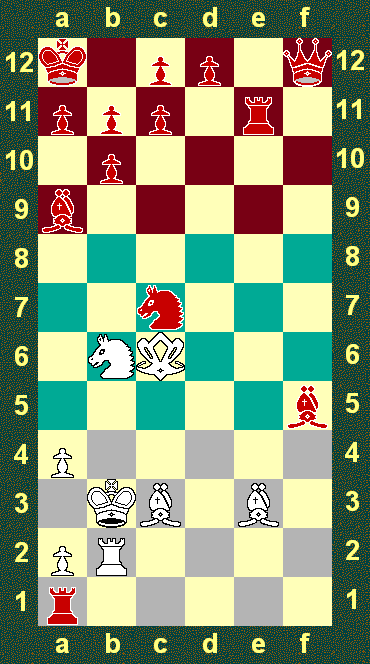
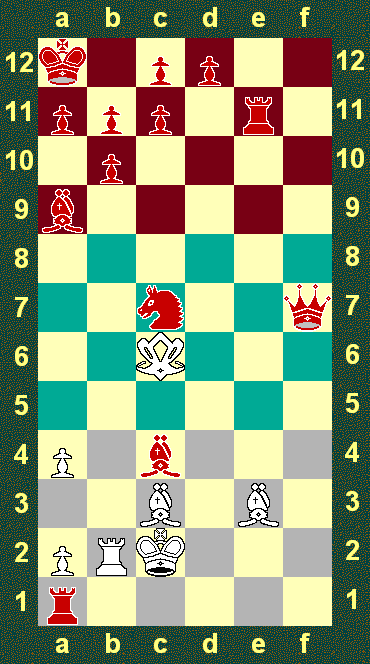
Garry now moves his pawn on e4 to e6 where it attacks Judit's Knight (remember Pawns move one or two squares forwards but capture one square diagonally forwards only)...
3: e6
3: e6
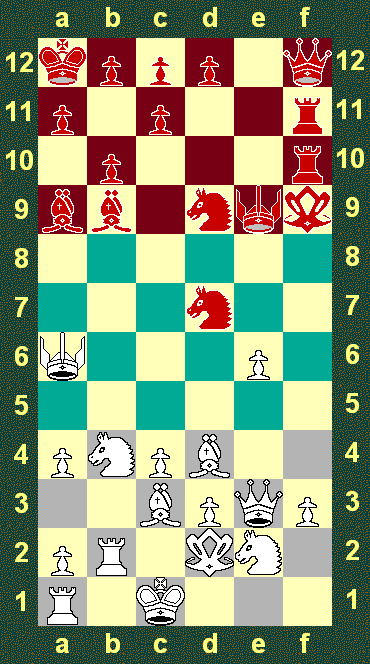
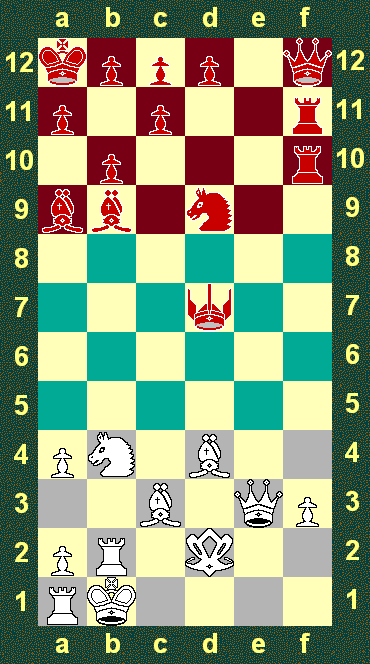
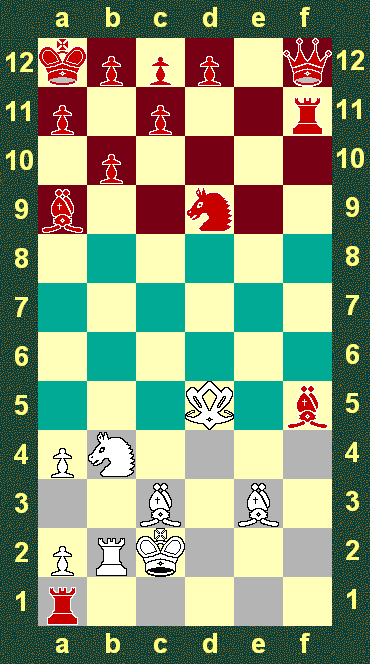
Judit now plays a very clever move! Although her Knight is attacked, she moves her Princess instead...!
3: ... Sf5
3: ... Sf5
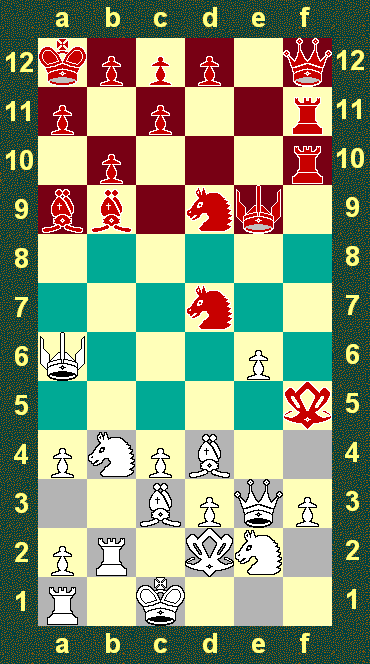
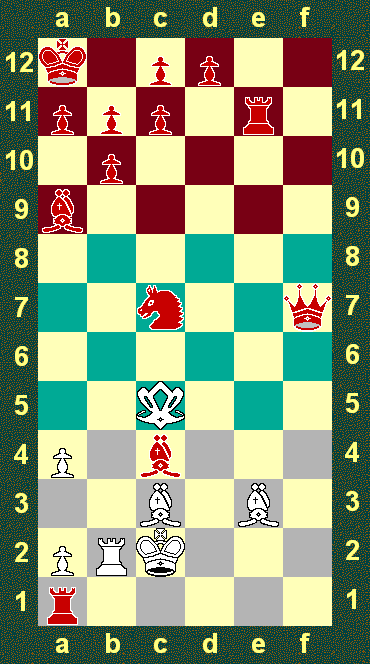
Garry thinks Judit has made a mistake and greedily snaps up her Knight with his Pawn!
4: Pxd7
4: Pxd7
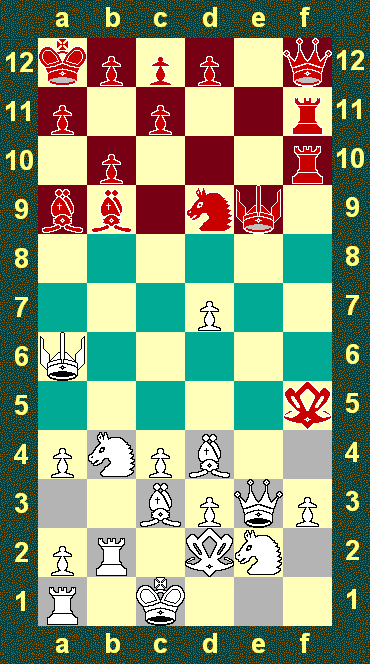
However, this is part of Judit's plan! Her Princess jumps over Garry's pawn on f3 to land on f1...!
4: ... Sf1
4: ... Sf1
To understand this, we must learn the Princess' move.
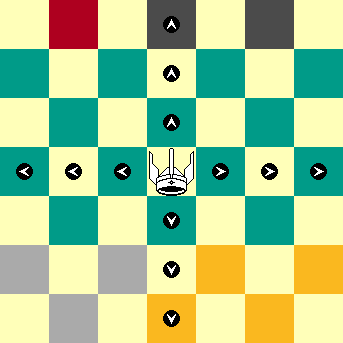
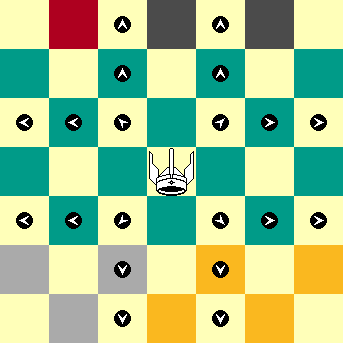
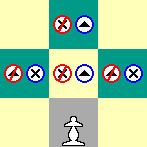
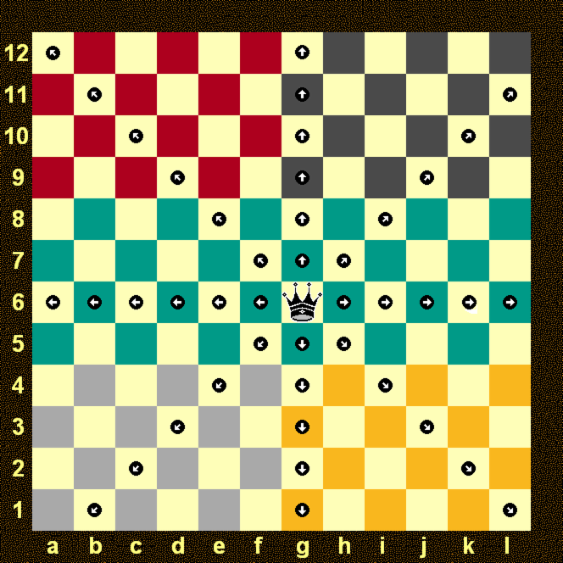
The Princess either moves up to 4 squares in any direction (with optional multiple captures) or jumps to any square in her range which is empty or occupied by an opponent's piece (in which case that piece is captured).
Note that, if the Princess jumps, she can only make a single capture.
If the Princess makes a multiple capture, she cannot jump.
Finally, if the Princess makes a multiple capture, the move must always end with the last piece captured.
The Princess' move is summarised by the diagram below:

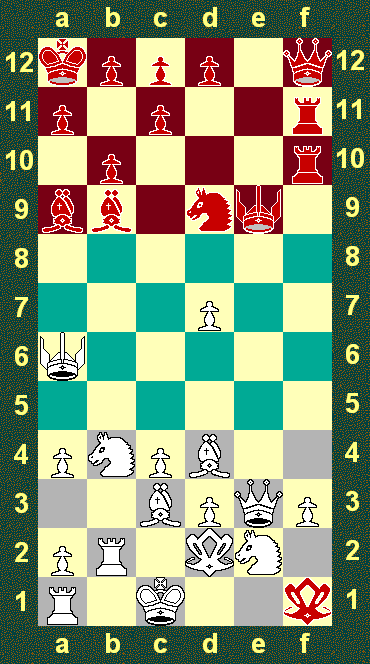
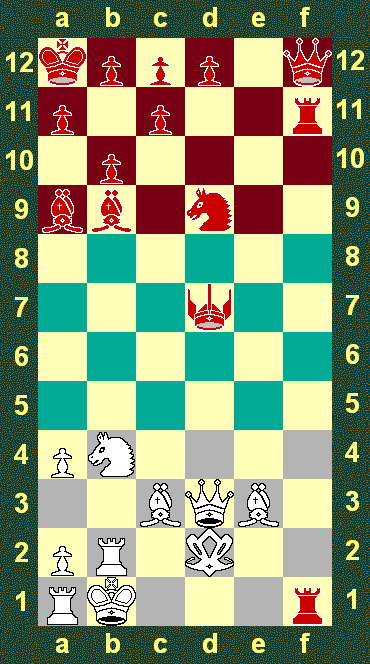
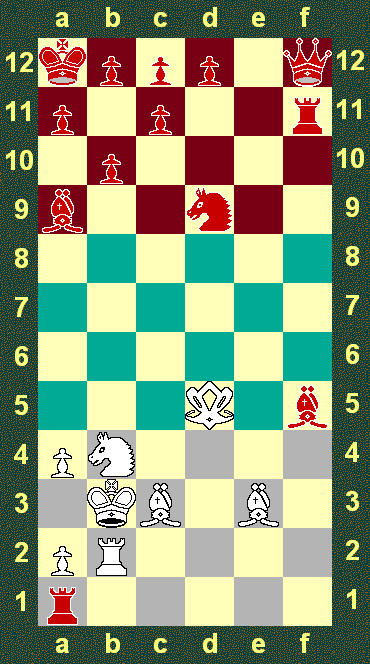
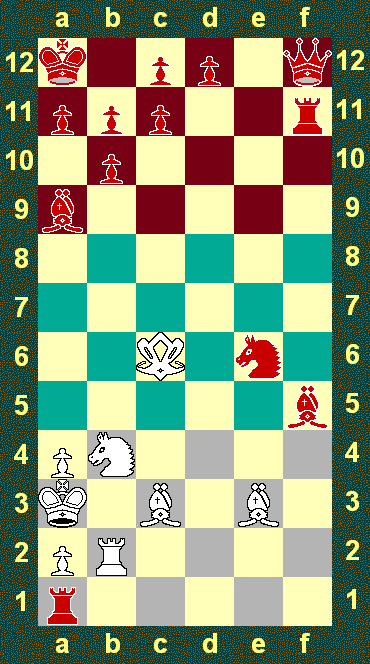
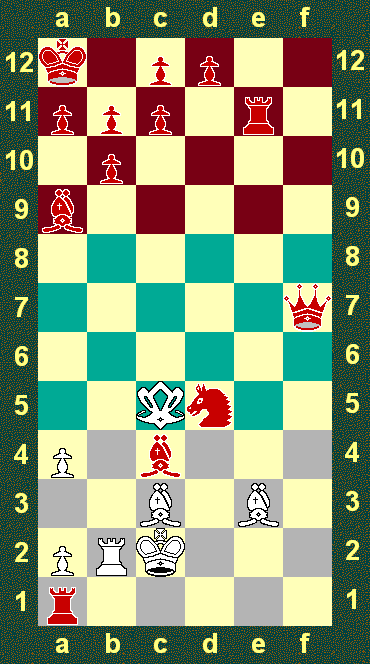
Let's now return to the game. Garry must move his King because it could be captured by Judit's Princess.
5: Kc2
5: Kc2

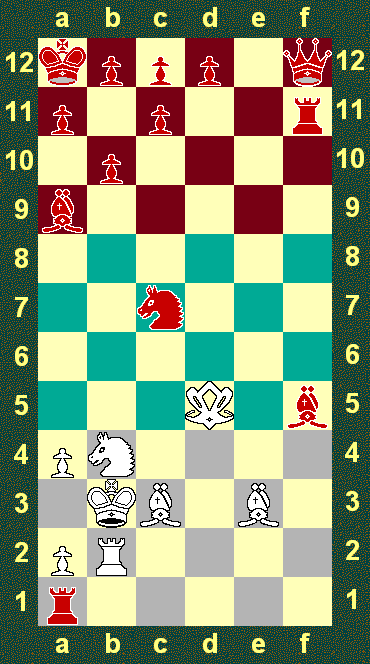
Judit now can use the multiple capture special power of the Princess to capture Garry's Knight and two Pawns:
5: ... Sxe2, d3, c4
5: ... Sxe2, d3, c4

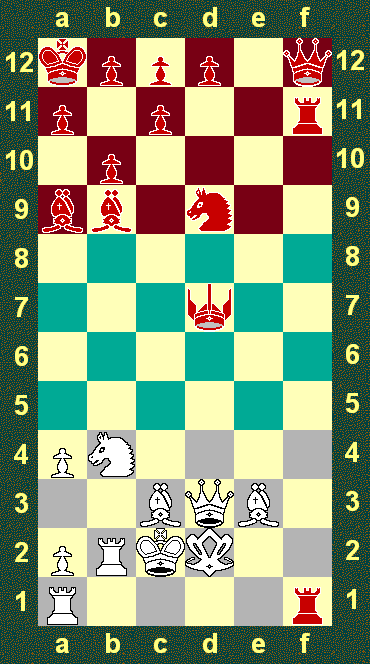
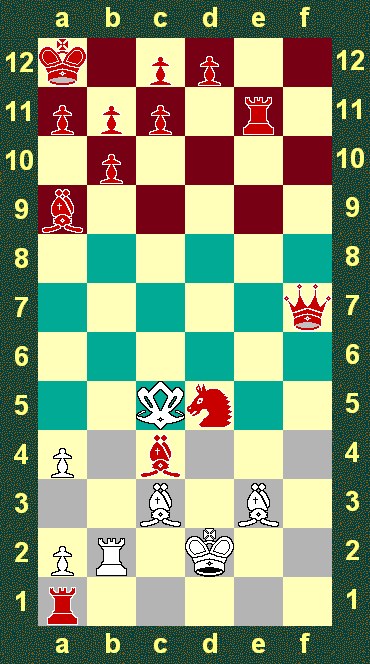
Garry sees that his King is again threatened with capture (Judit's Princess could potentially capture Garry's Bishop on c3 and his King on c2) so he moves his King to b1.
6: Kb1
6: Kb1
Judit thinks carefully. She knows that, in Judtho, it is not permitted to play a move that recreates the same position with the same player to move (i.e. repeated position is illegal). Therefore, if she moved her Princess back to f1 and Garry moved his King to c2, she would not be allowed to move her Princess to c4 as that would be the same position as the picture just above. Instead, she could play to f5 after which Garry would move his King to b3. If she then tried to continue attacking Garry's King by moving her Princess to f7, Garry would move his King to a3 where it would be safe. Judit would then need to protect the b7 Bishop but she would be in a difficult position as Garry could play his Princess to a5 where he would have a very powerful attack (e.g. capturing the Bishop on a9 with his Princess and then recapturing with his Prince and winning next move). Judit decides therefore to capture Garry's Prince on a6 - she is aware that her Princess will be captured by Garry's Knight on b4.
6: ... Sxa6
6: ... Sxa6
Garry uses a special power of the Knight in Judtho to capture Judit's Princess - the power of distant capture! Garry simply removes the Princess on a6 but, remember, with this power the Knight must remain where it is on b4.
7: N*a6
7: N*a6
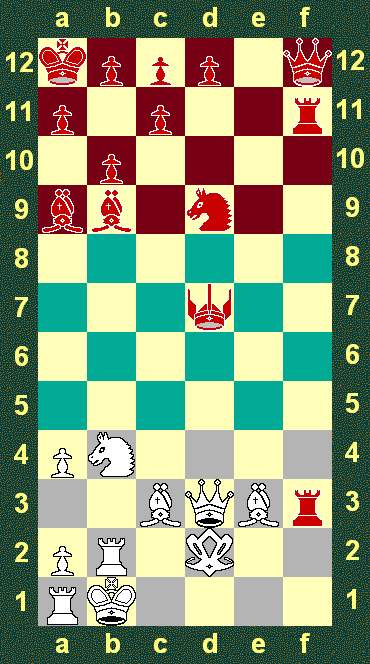
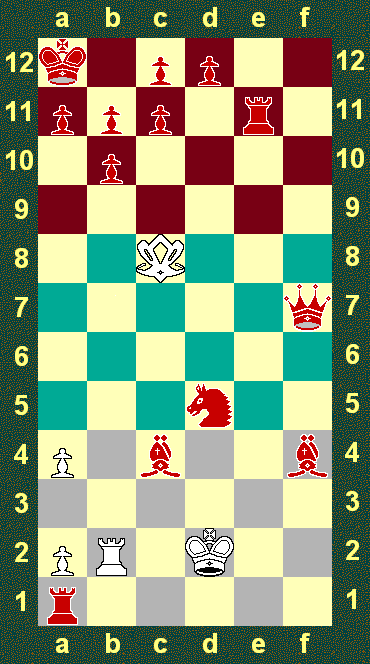
Judit now captures Garry's Pawn on d7 with her Prince. Note that her Prince is threatening to move to c4 in a very dangerous attack against Garry's King. Notice that Judit's Prince is just out of range of Garry's Princess.
7: ... Cxd7
7: ... Cxd7
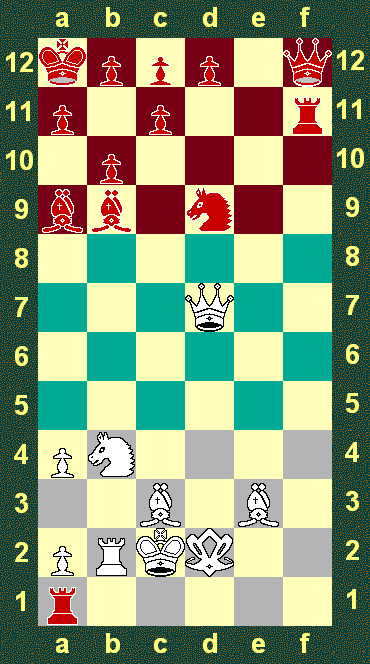
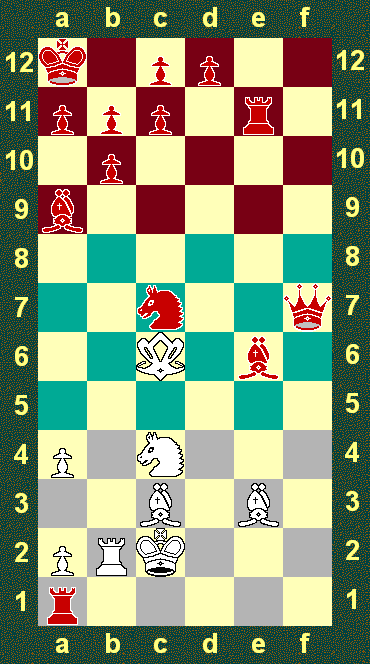
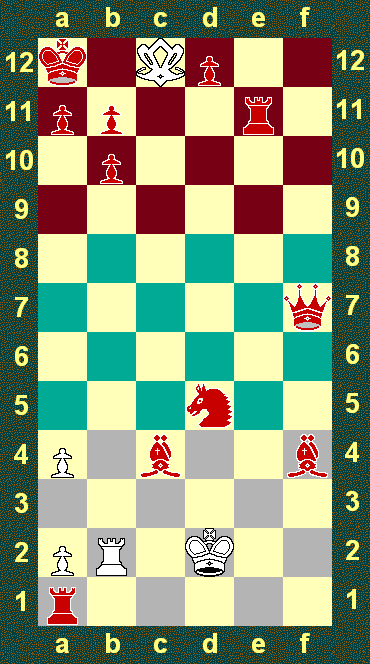
Garry protects the c4 square with his Queen.
8: Qd3
8: Qd3
The Queen moves any number of squares along a rank or file or diagonally but cannot jump over pieces or make multiple captures.
Judit now captures Garry's pawn on f3 with her Rook which then attacks Garry's Queen.
8: ... Rxf3
8: ... Rxf3

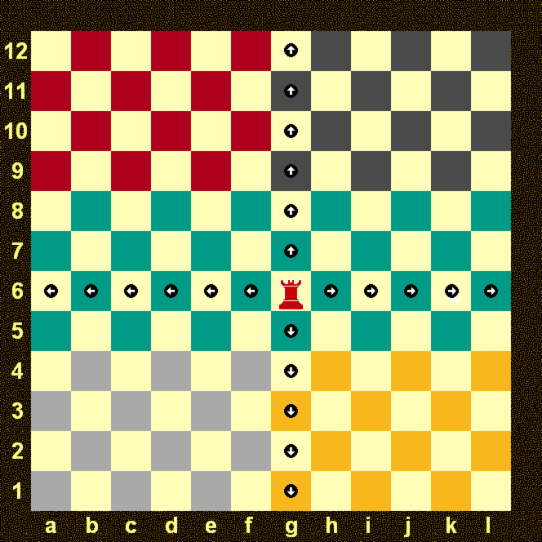
The Rook moves any number of squares along a rank or file but cannot jump over pieces or make multiple captures.
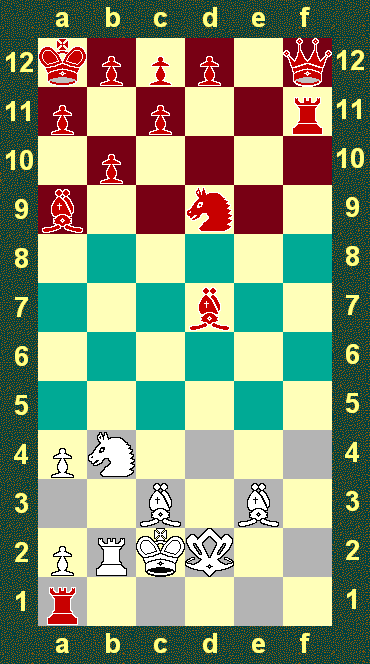
Garry defends his Queen by moving his Bishop in between his Queen and Judit's Rook (remember the Rook, as a Long Range piece, cannot make multiple captures or jump). This Bishop move also uncovers an attack from Garry's Queen onto Judit's Prince on d7...
9: Be3
9: Be3
Judit goes for the Rook on a1, accepting the loss of her Prince for Garry's Queen in the moves to come...
9: ... Rf1
9: ... Rf1
Garry moves his King to the only safe square of c2.
10: Kc2
10: Kc2
Judit captures the Rook on a1.
10: ... Rxa1
Garry captures Judit's Prince with his Queen...
11: Qxd7
10: ... Rxa1
Garry captures Judit's Prince with his Queen...
11: Qxd7
...and Judit captures back with her Bishop.
11: ... Bxd7
11: ... Bxd7
Garry now moves his Princess to d5 which threatens to capture both the Bishop on d7 and the Knight on d9 in one move. He would also be attacking Judit's King after this move. He is also threatening to move to a8, where he would also have a powerful attack against Judit's King.
12: Sd5
12: Sd5
Judit moves her Bishop to f5 attacking Garry's King, after which she can move her Knight to c7.
12: ... Bf5
12: ... Bf5
Garry moves his King to b3, hoping it will be protected enough by the surrounding pieces.
13: Kb3
13: Kb3
Judit moves her Knight to c7 to attack Garry's Princess... and to be dangerously close to Garry's King...
13: ... Nc7
13: ... Nc7
Garry moves his Princess to c6 where she could move to three squares which would attack Judit's King: a8, c10 and e8...
14: Sc6
14: Sc6
Judit replies by moving her Knight to e6 where it threatens to win the game by moving to either c5 or d4 where it would attack Garry's King (i.e. knatch it).
14: ... Ne6
14: ... Ne6
Garry does not have time to move his Princess, even though moving her to c10 or e8 would have potentially won him the game. Instead, he must move his King or else it will be knatched next move!
15: Ka3
15: Ka3

Now it is Judit's turn to defend her King! She plays b11 which gives her King the escape square of b12 but also defends a10 and c10.
15: ... b11
15: ... b11
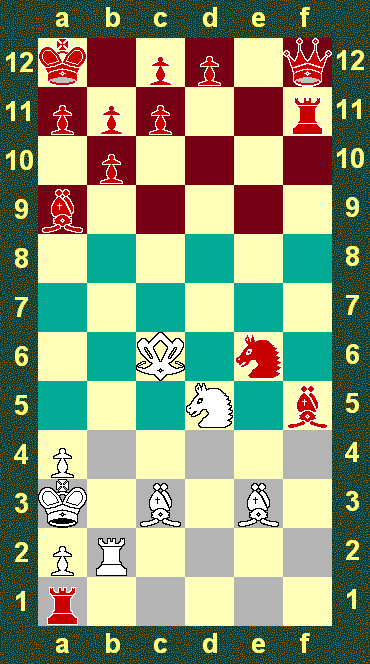
Garry moves his Knight to d5 as he realises that his Princess is unlikely to be able to win the game for him on her own. This move also allows the Rook on b2 to cover the b-file and prevents Judit from playing her Knight to c7 as it could be distant captured by Garry's Knight.
16: Nd5
16: Nd5
Judit moves her Rook to e11 with a view to moving her Knight to d8 next move, attacking Garry's Princess and her Bishop on e3. This move also prevents Garry's Knight moving to e7 or his Princess moving to e8.
16: ... Re11
16: ... Re11

Garry moves his Knight to b6 where it is two moves away from knatching Judit's King...
17: Nb6
17: Nb6
Judit responds by moving her Knight to c7 where it immediately threatens to knatch Garry's King!
17: ... Nc7
17: ... Nc7
Garry has no choice but to move his King to b3.
18: Kb3
18: Kb3
Judit now attacks with her Queen...
18: ... Qf7
18: ... Qf7

Garry's King has no safe square to move to (his King will be knatched if it moves to a3 or b4)! He must interpose a piece and so he moves his Knight to c4.
19: Nc4
19: Nc4

Judit realises that she must be careful. She thought of Rxe3 but realises that Garry's Knight could capture her Rook without moving! So she plays Be6, pinning the annoying Knight against Garry's King!
19: ... Be6
19: ... Be6

Garry realises his Knight is lost and with it, perhaps the game... Yet, he sees that Judit's back rank (rank 12) is not so well protected... If only he could capture either the c12 or d12 pawns with his Princess... In the meantime, he moves his King to c2...
20: Kc2
20: Kc2
Judit happily snaps up Garry's Knight with her Bishop...
20: ... Bxc4
20: ... Bxc4
Garry knows the game is lost now. There really isn't any good move as the threat of Judit's Queen moving to f5 looks deadly and her Rook on e11 is threatening to capture Garry's Bishop on e3... Garry moves his Princess to c5 protecting his Bishop and the f5 square and hopes for Judit to make a mistake...
21: Sc5
21: Sc5
Judit knows she's won but decides to have some fun, so she plays her Knight to d5 threatening to knatch Garry's King...
21: ... Nd5
21: ... Nd5
Garry moves his King to d2...
22: Kd2
22: Kd2
Judit distant captures both of Garry's Bishops!
22: ... N*c3, e3 (30)
22: ... N*c3, e3 (30)

Garry launches a counterattack with his Princess but knows it will be too late...
23: Sc8
23: Sc8

Judit has an embarrassing number of ways to win the game! She could play Qf4 or Qf2 or Re2 or even Rd1 (if the White King captures the Rook on d1, it is knatched next move)... However, she chooses to win with her weakest piece and plays Bf4...
23: ... Bf4
23: ... Bf4
Garry decides to go down fighting and multiple captures with his Princess (she could also have jumped to c12)...
24: Sxd11, d12
24: Sxd11, d12
Judit's King will be captured next move... unless she captures Garry's King first!
She does this and wins the game!
24: ... Bxd2++ (0 - 4)
She does this and wins the game!
24: ... Bxd2++ (0 - 4)

In Judtho, 4 points is given for a win in the two player (Duo) game and this is denoted as 4 - 0 if White wins and 0 - 4 if Red wins.
I do hope you enjoyed following this sample game. Feel free to send comments or suggestions through the feedback page on the Home page.
I do hope you enjoyed following this sample game. Feel free to send comments or suggestions through the feedback page on the Home page.